Introduction
What is Kdu.js?
Kdu is a progressive framework for building user interfaces. Unlike other monolithic frameworks, Kdu is designed from the ground up to be incrementally adoptable. The core library is focused on the view layer only, and is easy to pick up and integrate with other libraries or existing projects. On the other hand, Kdu is also perfectly capable of powering sophisticated Single-Page Applications when used in combination with modern tooling.
If you are an experienced frontend developer and want to know how Kdu compares to other libraries/frameworks, check out the Comparison with Other Frameworks.
Getting Started
The official guide assumes intermediate level knowledge of HTML, CSS, and JavaScript. If you are totally new to frontend development, it might not be the best idea to jump right into a framework as your first step - grasp the basics then come back! Prior experience with other frameworks helps, but is not required.
The easiest way to try out Kdu.js is using the Hello World example. Feel free to open it in another tab and follow along as we go through some basic examples. Or, you can create an index.html file and include Kdu with:
|
or:
|
The Installation page provides more options of installing Kdu. Note: We do not recommend that beginners start with kdu-cli, especially if you are not yet familiar with Node.js-based build tools.
Declarative Rendering
At the core of Kdu.js is a system that enables us to declaratively render data to the DOM using straightforward template syntax:
|
|
We have already created our very first Kdu app! This looks pretty similar to rendering a string template, but Kdu has done a lot of work under the hood. The data and the DOM are now linked, and everything is now reactive. How do we know? Open your browser’s JavaScript console (right now, on this page) and set app.message to a different value. You should see the rendered example above update accordingly.
Note that we no longer have to interact with the HTML directly. A Kdu app attaches itself to a single DOM element (#app in our case) then fully controls it. The HTML is our entry point, but everything else happens within the newly created Kdu instance.
In addition to text interpolation, we can also bind element attributes like this:
|
|
Here we are encountering something new. The k-bind attribute you are seeing is called a directive. Directives are prefixed with k- to indicate that they are special attributes provided by Kdu, and as you may have guessed, they apply special reactive behavior to the rendered DOM. Here, it is basically saying “keep this element’s title attribute up-to-date with the message property on the Kdu instance.”
If you open up your JavaScript console again and enter app2.message = 'some new message', you’ll once again see that the bound HTML - in this case the title attribute - has been updated.
Conditionals and Loops
It’s easy to toggle the presence of an element, too:
|
|
Go ahead and enter app3.seen = false in the console. You should see the message disappear.
This example demonstrates that we can bind data to not only text and attributes, but also the structure of the DOM. Moreover, Kdu also provides a powerful transition effect system that can automatically apply transition effects when elements are inserted/updated/removed by Kdu.
There are quite a few other directives, each with its own special functionality. For example, the k-for directive can be used for displaying a list of items using the data from an Array:
|
|
- {{ todo.text }}
In the console, enter app4.todos.push({ text: 'New item' }). You should see a new item appended to the list.
Handling User Input
To let users interact with your app, we can use the k-on directive to attach event listeners that invoke methods on our Kdu instances:
|
|
{{ message }}
Note that in this method we update the state of our app without touching the DOM - all DOM manipulations are handled by Kdu, and the code you write is focused on the underlying logic.
Kdu also provides the k-model directive that makes two-way binding between form input and app state a breeze:
|
|
{{ message }}
Composing with Components
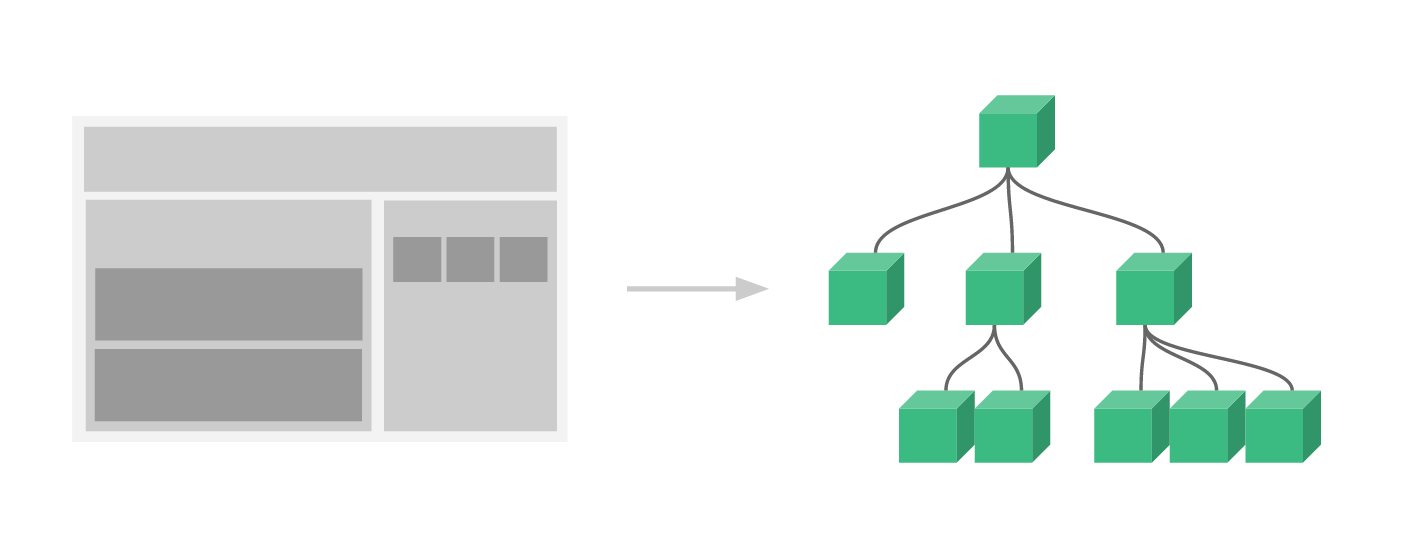
The component system is another important concept in Kdu, because it’s an abstraction that allows us to build large-scale applications composed of small, self-contained, and often reusable components. If we think about it, almost any type of application interface can be abstracted into a tree of components:
In Kdu, a component is essentially a Kdu instance with pre-defined options. Registering a component in Kdu is straightforward:
|
Now you can compose it in another component’s template:
|
But this would render the same text for every todo, which is not super interesting. We should be able to pass data from the parent scope into child components. Let’s modify the component definition to make it accept a prop:
|
Now we can pass the todo into each repeated component using k-bind:
|
|
This is a contrived example, but we have managed to separate our app into two smaller units, and the child is reasonably well-decoupled from the parent via the props interface. We can now further improve our <todo-item> component with more complex template and logic without affecting the parent app.
In a large application, it is necessary to divide the whole app into components to make development manageable. We will talk a lot more about components later in the guide, but here’s an (imaginary) example of what an app’s template might look like with components:
|
Relation to Custom Elements
You may have noticed that Kdu components are very similar to Custom Elements, which are part of the Web Components Spec. That’s because Kdu’s component syntax is loosely modeled after the spec. For example, Kdu components implement the Slot API and the is special attribute. However, there are a few key differences:
The Web Components Spec has been finalized, but is not natively implemented in every browser. Safari 10.1+, Chrome 54+ and Firefox 63+ natively support web components. In comparison, Kdu components don’t require any polyfills and work consistently in all supported browsers (IE9 and above). When needed, Kdu components can also be wrapped inside a native custom element.
Kdu components provide important features that are not available in plain custom elements, most notably cross-component data flow, custom event communication and build tool integrations.
Although Kdu doesn’t use custom elements internally, it has great interoperability when it comes to consuming or distributing as custom elements. Kdu CLI also supports building Kdu components that register themselves as native custom elements.
Ready for More?
We’ve briefly introduced the most basic features of Kdu.js core - the rest of this guide will cover them and other advanced features with much finer details, so make sure to read through it all!